How to integrate PayPal Checkout with Spring Boot

PayPal is world’s most popular online payment platform. It is the default choice for most online merchants and is integrated by default into virtually all shopping carts.
Spring Boot is the most popular Java framework for developing web applications. In this post, we will learn how to integrate PayPal Checkout API with Spring Boot REST backend.
Table Of Contents
Configure PayPal application
The first step, we need to configure PayPal application for integrating with the PayPal API. This is done in the PayPal Developer portal, the entry point for all development related activities. You can log in to the portal with your PayPal credentials.
In this section, we will go through the steps required to create an application. The screenshot bellow outlines the user interface for the process
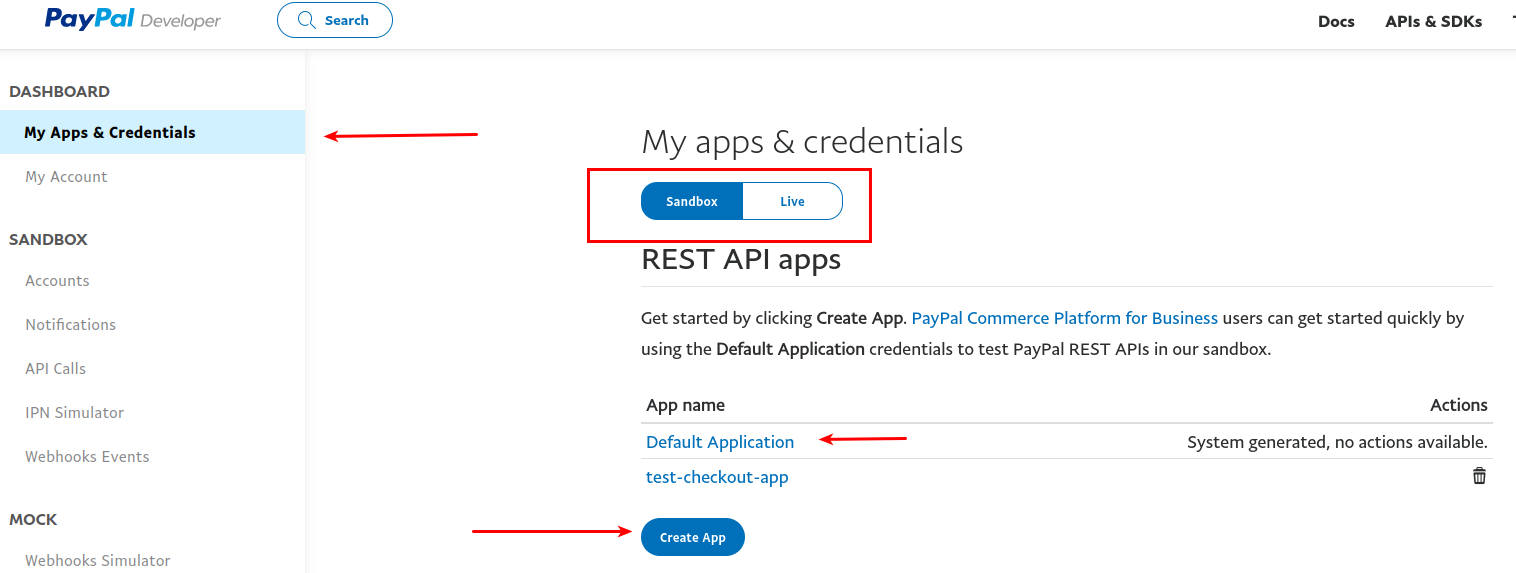
How to create application in PayPal developer console
PayPal provides testing environment called “Sandbox”. You can use this environment to test your integration before going live. You need to make sure that your application is created in this environment, so you can test it correctly.
Using the screenshot above as the reference, do the following steps:
in the right-hand menu, select “My app and credentials”
Make sure that “Sandbox” button is selected
PayPal provides default application (unsurprisingly, called “Default application”). You can use this one, or create new application. For this post, we will create new app
Click on the “Create App” button to initiate creating new application
You will be taken to the application details page:
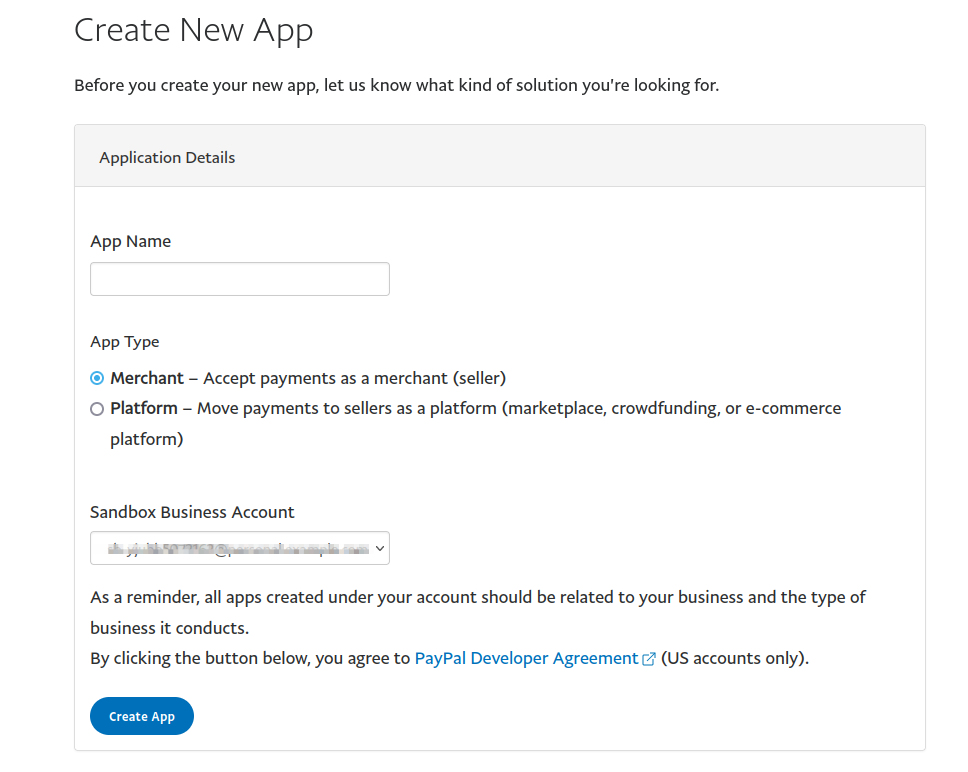
Fill in application details in PayPal developer console
In this screen, you just need to enter application name. You can leave everything else as is.
Configure test accounts
You will need to create test accounts to test your application. These accounts enable you to make payments in your sandbox.
In order to create new test accounts, click on “Accounts” link in the left side menu, just under “Sandbox” entry. This will take you to the account creation page.
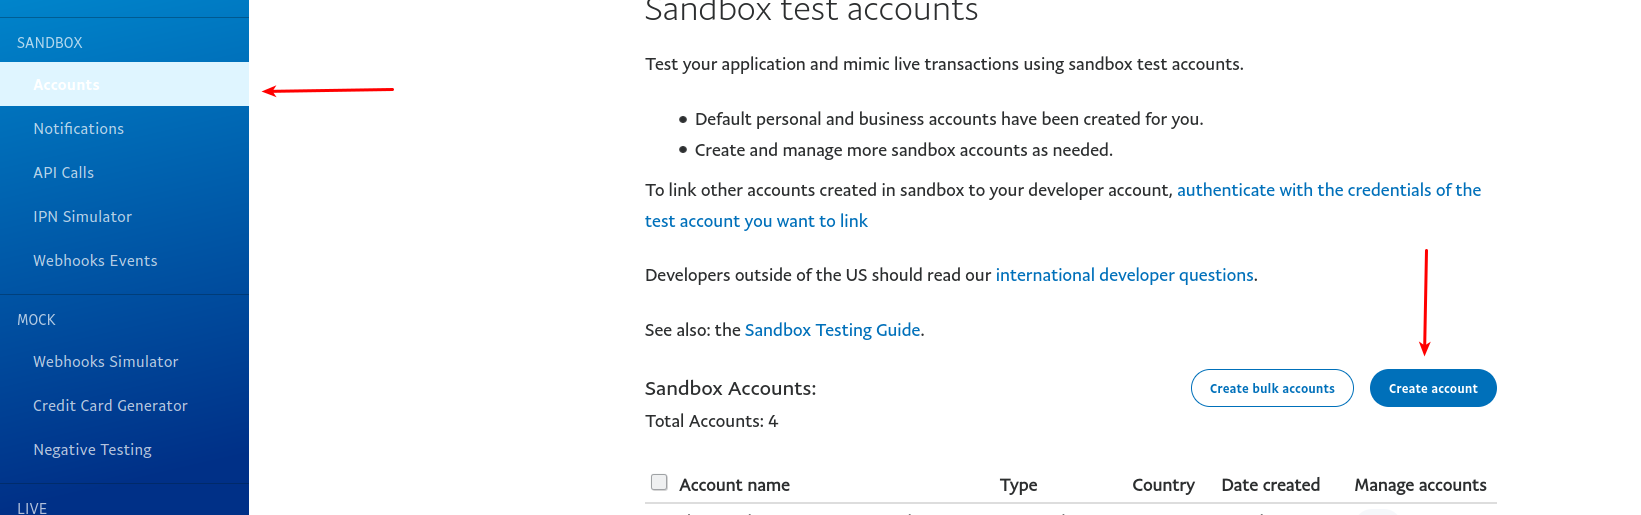
Create test acount for testing
Existing test accounts for your sandbox will be shown here. Click on “Create account” button.
This will open a popup window where you can specify account details.
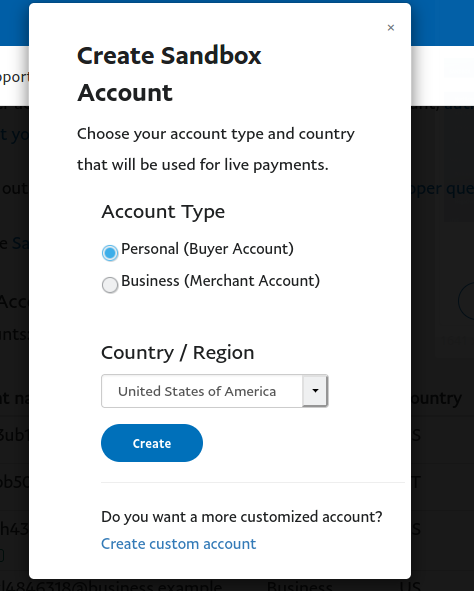
Fill in details for PayPal test account
You can either accept default settings or further customize the account for your needs.
PayPal Checkout workflow
Before we start with integration, we need to understand the flow of using PayPal Checkout API. This is depicted in the diagram bellow:

PayPal checkout flow
Buyer initiates the checkout at the app server
app server invokes PayPal API to create an order
PayPal API replies with successful order response. The response contains URLs of the page where user should approve the purchase
app server redirects user to PayPal to approve payment
user logs in to a PayPal account and approve the payment
after the user approves the payment, PayPal sends a notification to application-specific URL about the payment
We will be implementing server part of this flow in our Spring Boot application
Spring Boot application architecture
For this post, we will implement very simple application with the following components:
database - will be used to store order data so we can track it. We’ll be using H2 in-memory database, for the sake of simplicity
Liquibase - will be used to create and initialize database structure. Liquibase will run at the application startup
JPA/Hibernate - we’ll use this as a persistence layer to save orders into DB
Lombok - simplifies POJO objects creation
Spring Boot will be used to glue all the pieces together. You can use Spring Initializr to create the project for you. You should select the following components:
Spring Web
Spring Data JPA
Liquibase support
H2 database
Lombok
If you don’t want to create project yourself, you can use the source code on Github.
Database configuration
For the sake of simplicity, we will keep the database simple. It will have only one table called orders. Table structure is shown in the table bellow:
| column name | data type | description |
|---|---|---|
id | integer | primary key, auto increment |
paypal_order_id | varchar(32) | order ID from PayPal |
paypal_order_status | varchar(32) | order status from PayPal |
Column id is a table primary key with auto incremented value. For auto increment to work, we will need to also create a sequence from which new values will be assigned.
In order to create database structure, we will use the following Liquibase file:
<databaseChangeLog
        xmlns="http://www.liquibase.org/xml/ns/dbchangelog"
        xmlns:ext="http://www.liquibase.org/xml/ns/dbchangelog-ext"
        xmlns:xsi="http://www.w3.org/2001/XMLSchema-instance"
        xsi:schemaLocation="http://www.liquibase.org/xml/ns/dbchangelog-ext
   http://www.liquibase.org/xml/ns/dbchangelog/dbchangelog-ext.xsd
   http://www.liquibase.org/xml/ns/dbchangelog
   http://www.liquibase.org/xml/ns/dbchangelog/dbchangelog-3.4.xsd">

    <changeSet author="John" id="someUniqueId">
        <createTable tableName="orders">
            <column name="id" type="integer">
                <constraints primaryKey="true" />
            </column>
            <column name="paypal_order_id" type="varchar(32)" />
            <column name="paypal_order_status" type="varchar(32)" />
        </createTable>

        <createSequence catalogName="cat" cycle="false"
                        incrementBy="1" ordered="true" schemaName="public"
                        sequenceName="hibernate_sequence" startValue="0" />
    </changeSet>

</databaseChangeLog>
Now, to have our Spring Boot application create a database structure on startup, we need to configure database connection and Liquibase settings. We will add the following to Spring Boot application.properties file:
spring.datasource.url=jdbc:h2:mem:testdb
spring.datasource.driverClassName=org.h2.Driver
spring.datasource.username=sa
spring.datasource.password=password
spring.jpa.database-platform=org.hibernate.dialect.H2Dialect
spring.h2.console.enabled=true
spring.liquibase.change-log=classpath:db/changelog/liquibase.xml
This will configure an in-memory database with name testdb, with user sa and password password. Our Liquibase changelog will be stored in file src/main/resources/db/changelog/liquibase.xml under project root directory.
You can now run the application using mvn spring-boot:run command. It will create database structure upon startup.
Notice the property spring.h2.console.enabled. This will give us access to H2 console at the URL http://localhost:8080/h2-console/. You can access the console and check if the database has been created correctly.
DAO layer
For DAO layer, we will have a single JPA entity representing an order, and a Spring Data interface for persistence operations.
Order entity is implemented like this:
package co.bitshifted.paypalcheckoutspringboot.dao;

import lombok.Data;

import javax.persistence.*;

@Entity
@Table(name = "orders")
@Data
public class Order {
    @Id
    @GeneratedValue(strategy = GenerationType.AUTO)
    private Long id;
    @Column(name = "paypal_order_id")
    private String paypalOrderId;
    @Column(name = "paypal_order_status")
    private String paypalOrderStatus;
}
And corresponding Spring Data interface:
package co.bitshifted.paypalcheckoutspringboot.dao;

import org.springframework.data.repository.CrudRepository;

public interface OrderDAO extends CrudRepository<Order, Long> {

    Order findByPaypalOrderId(String paypalOrderId);
}
Here, we will define a single custom method findByPaypalOrderId. We will use ti to find an order by a PayPal ID.
PayPal HTTP client
PayPal provides a Java SDK, but it has been deprecated. We can still use PayPal REST API, but will need to implement the client ourselves. It is easy to do using Java’s built-in HTTP client.
For reference, you can find the documetnation for PayPal REST APIs here.
Before we start building the client, we need to get API credentials. You can find them in your app settings in developer dashboard. We will need two pieces of information: client ID and client secret.
We need to add this information into application.properties file:
paypal.baseUrl=https://api-m.sandbox.paypal.com
paypal.clientId=YOUR CLIENT ID
paypal.secret=-YOUR SECRET
Property paypal.baseUrl is the base URL of PayPal API. For sandbox, you can use the above URL. When you move the application to production, actual production URL will should be used.
We will create configuration class for PayPal properties. It will read a configuration from the properties file:
package co.bitshifted.paypalcheckoutspringboot.config;

import lombok.Getter;
import lombok.Setter;
import org.springframework.boot.context.properties.ConfigurationProperties;
import org.springframework.context.annotation.Configuration;

import javax.validation.constraints.NotEmpty;

@Configuration
@Getter
@Setter
@ConfigurationProperties(prefix = "paypal")
public class PaypalConfig {

    @NotEmpty
    private String baseUrl;
    @NotEmpty
    private String clientId;
    @NotEmpty
    private String secret;
}
Our client will be a Spring @Component, so we can use Spring’s auto-wiring capabilities.
@Component
@Slf4j
public class PayPalHttpClient {
    private final HttpClient httpClient;
    private final PaypalConfig paypalConfig;
    private final ObjectMapper objectMapper;

    @Autowired
    public PayPalHttpClient(PaypalConfig paypalConfig, ObjectMapper objectMapper) {
        this.paypalConfig = paypalConfig;
        this.objectMapper = objectMapper;
        httpClient = HttpClient.newBuilder()
            .version(HttpClient.Version.HTTP_1_1)
        .build();
    }
}
In the constructor, we instantiate Java HTTP client, which will be used for executing requests.
As a convenience, we will define an enum with PayPal API endpoints we need to interact with:
package co.bitshifted.paypalcheckoutspringboot;

public enum PayPalEndpoints {
    GET_ACCESS_TOKEN("/v1/oauth2/token"),
    GET_CLIENT_TOKEN("/v1/identity/generate-token"),
    ORDER_CHECKOUT("/v2/checkout/orders");

    private final String path;

    PayPalEndpoints(String path) {
        this.path = path;
    }

    public static String createUrl(String baseUrl, PayPalEndpoints endpoint) {
        return baseUrl + endpoint.path;
    }

    public static String createUrl(String baseUrl, PayPalEndpoints endpoint, String... params) {
        return baseUrl + String.format(endpoint.path, params);
    }

}
This enum also contains few utility methods to help with API calls.
Obtain access token
Each request to PayPal API must be authenticated. For this, first step is to exchange API credentials for an access token.
public AccessTokenResponseDTO getAccessToken() throws Exception {
        var request = HttpRequest.newBuilder()
                .uri(URI.create(createUrl(paypalConfig.getBaseUrl(), GET_ACCESS_TOKEN)))
                .header(HttpHeaders.ACCEPT, MediaType.APPLICATION_JSON_VALUE)
                .header(HttpHeaders.AUTHORIZATION, encodeBasicCredentials())
                .header(HttpHeaders.ACCEPT_LANGUAGE, "en_US")
                .header(HttpHeaders.CONTENT_TYPE, MediaType.APPLICATION_FORM_URLENCODED_VALUE)
                .POST(HttpRequest.BodyPublishers.ofString("grant_type=client_credentials"))
                .build();
        var response = httpClient.send(request, HttpResponse.BodyHandlers.ofString());
        var content = response.body();
        return objectMapper.readValue(content, AccessTokenResponseDTO.class);
    }
This method returns an AccessTokenResponseDTO object, from which we can obtain the actual access token as a string.
package co.bitshifted.paypalcheckoutspringboot.dto;

import com.fasterxml.jackson.annotation.JsonIgnore;
import com.fasterxml.jackson.annotation.JsonIgnoreProperties;
import com.fasterxml.jackson.annotation.JsonProperty;
import lombok.Data;

import java.time.Instant;

@Data
@JsonIgnoreProperties(ignoreUnknown = true)
public class AccessTokenResponseDTO {
    private String scope;
    @JsonProperty("access_token")
    private String accessToken;
    @JsonProperty("token_type")
    private String tokenType;
    @JsonProperty("app_id")
    private String applicationId;
    @JsonProperty("expires_in")
    private int expiresIn;
    private String nonce;
    @JsonIgnore
    private Instant expiration;
}
In this DTO, we map all API response fields to class fields.
Creating order in PayPal API
When user initiates a checkout, our application needs to create an order by invoking /v2/checkout/orders endpoint using HTTP POST method.
PayPal’s order object is quite complex (you can check out complete specification). But, fortunately, most of the fields are optional. We can get away by simply specifying purchase units with amount and currency. Minimal payload is shown bellow:
{
  "intent": "CAPTURE",
  "purchase_units": [
    {
      "amount": {
        "currency_code": "USD",
        "value": "100.00"
      }
    }
  ]
}
Field intent can be either CAPTURE or AUTHORIZE. Capturing the payment means that seller takes money from buyer’s account immediately, while authorization reserves the funds in buyer’s account which can be collected later. In our code, we use enum to represent these values:
package co.bitshifted.paypalcheckoutspringboot.dto;

public enum OrderIntent {
    CAPTURE,
    AUTHORIZE;
}
Complete order payload is represented by OrderDTO class:
package co.bitshifted.paypalcheckoutspringboot.dto;

import com.fasterxml.jackson.annotation.JsonProperty;
import lombok.Data;

import java.io.Serializable;
import java.util.List;

@Data
public class OrderDTO implements Serializable {
    private OrderIntent intent;
    @JsonProperty("purchase_units")
    private List<PurchaseUnit> purchaseUnits;
    @JsonProperty("application_context")
    private PayPalAppContextDTO applicationContext;
}
Field applicationContext is important for one reason: it contains the URL to which PayPal will redirect user after successful payment. We will use this URL to process payment notification.
Application context class is pretty simple:
package co.bitshifted.paypalcheckoutspringboot.dto;

import com.fasterxml.jackson.annotation.JsonProperty;
import lombok.Data;

@Data
public class PayPalAppContextDTO {
    @JsonProperty("brand_name")
    private String brandName;
    @JsonProperty("landing_page")
    private PaymentLandingPage landingPage;
    @JsonProperty("return_url")
    private String returnUrl;
    @JsonProperty("cancel_url")
    private String cancelUrl;
}
There are few more fields in here, but I won’t get into details now. You can check out the details in API reference.
Finally, we add the method to create an order to our API client:
 public OrderResponseDTO createOrder(OrderDTO orderDTO) throws Exception {
        var accessTokenDto = getAccessToken();
        var payload = objectMapper.writeValueAsString(orderDTO);

        var request = HttpRequest.newBuilder()
                .uri(URI.create(createUrl(paypalConfig.getBaseUrl(), ORDER_CHECKOUT)))
                .header(HttpHeaders.CONTENT_TYPE, MediaType.APPLICATION_JSON_VALUE)
                .header(HttpHeaders.AUTHORIZATION, "Bearer " + accessTokenDto.getAccessToken())
                .POST(HttpRequest.BodyPublishers.ofString(payload))
                .build();
        var response = httpClient.send(request, HttpResponse.BodyHandlers.ofString());
        var content = response.body();
        return objectMapper.readValue(content, OrderResponseDTO.class);

    }
This method uses access token method described in previous step. We use OrderDTO class as the request body payload.
If order is created successfully, PayPal API returns the following response:
{
  "id": "XXXXXX",
  "status": "CREATED",
  "links": [
    {
      "href": "https://api-m.paypal.com/v2/checkout/orders/XXXXXX",
      "rel": "self",
      "method": "GET"
    },
    {
      "href": "https://www.paypal.com/checkoutnow?token=XXXXXX",
      "rel": "approve",
      "method": "GET"
    },
    {
      "href": "https://api-m.paypal.com/v2/checkout/orders/XXXXXX",
      "rel": "update",
      "method": "PATCH"
    },
    {
      "href": "https://api-m.paypal.com/v2/checkout/orders/5O190127TN364715T/capture",
      "rel": "capture",
      "method": "POST"
    }
  ]
}
Response contains unique order ID, status and a set of links. For our purposes, we need "rel": "approve" part. It contains the URL to which we need to redirect user to approve the payment.
Putting it all together
In order to run the test, we need to create an endpoint in our application to receive client’s checkout requests. We will create new controller for this:
@RestController
@RequestMapping(value = "/checkout")
@Slf4j
public class CheckoutController {

    private final PayPalHttpClient payPalHttpClient;
    private final OrderDAO orderDAO;

    @Autowired
    public CheckoutController(PayPalHttpClient payPalHttpClient, OrderDAO orderDAO) {
        this.orderDAO = orderDAO;
        this.payPalHttpClient = payPalHttpClient;
    }

    @PostMapping
    public ResponseEntity<OrderResponseDTO> checkout(@RequestBody OrderDTO orderDTO) throws Exception {
        var appContext = new PayPalAppContextDTO();
        appContext.setReturnUrl("http://localhost:8080/checkout/success");
        appContext.setBrandName("My brand");
        appContext.setLandingPage(PaymentLandingPage.BILLING);
        orderDTO.setApplicationContext(appContext);
        var orderResponse = payPalHttpClient.createOrder(orderDTO);

        var entity = new Order();
        entity.setPaypalOrderId(orderResponse.getId());
        entity.setPaypalOrderStatus(orderResponse.getStatus().toString());
        var out = orderDAO.save(entity);
        return ResponseEntity.ok(orderResponse);
    }

    @GetMapping(value = "/success")
    public ResponseEntity paymentSuccess(HttpServletRequest request) {
        var orderId = request.getParameter("token");
        var out = orderDAO.findByPaypalOrderId(orderId);
        out.setPaypalOrderStatus(OrderStatus.APPROVED.toString());
        orderDAO.save(out);
        return ResponseEntity.ok().build();
    }

}
Our entry point is POST /checkout endpoint. It will receive an OrderDTO object. For simplicity, we expect the client to send only the amount. We fill in the rest of the data in the endpoint itself.
After PayPal API returns the result, we create an Order entity and save it into database for future reference. The endpoint will return a response which contains URL to redirect the user to for payment.
When user completes the payment, PayPal will redirect him to /checkout/success endpoint. In it, we get the order from DB and update the status to mark the order as paid.
Note: This is an extremely simplified and not production-ready implementation. The goal here is just to show the principle of operation.
Test the complete flow
You can use Postman to test the entire payment flow. We will use the simplest order payload for testing, like in the screenshot bellow:
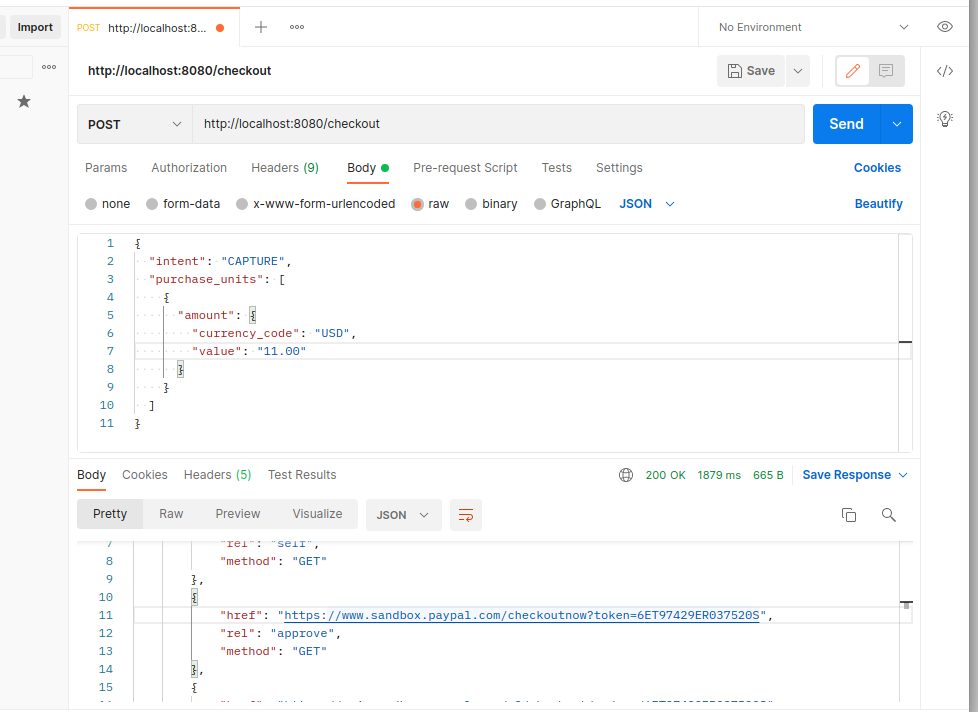
Create order using postman
The response will look something like this:
{
    "id": "XXXXXX",
    "status": "CREATED",
    "links": [
        {
            "href": "https://api.sandbox.paypal.com/v2/checkout/orders/XXXXXX",
            "rel": "self",
            "method": "GET"
        },
        {
            "href": "https://www.sandbox.paypal.com/checkoutnow?token=XXXXXX",
            "rel": "approve",
            "method": "GET"
        },
        {
            "href": "https://api.sandbox.paypal.com/v2/checkout/orders/XXXXXX",
            "rel": "update",
            "method": "PATCH"
        },
        {
            "href": "https://api.sandbox.paypal.com/v2/checkout/orders/XXXXXX/capture",
            "rel": "capture",
            "method": "POST"
        }
    ]
}
The next thing is to open your browser and go to the URL specified by "rel": "approve" link. This will open PayPal payment page. Use one of the test account you created for your sandbox and approve the payment.
After the payment is approved, PayPal will redirect the user to success URL specified in order payload. This is the /checkout/success endpoint in our app.
If you now check the order status in H2 database, it should be in COMPLETED status.
Final thoughts
This is it, the complete PayPal checkout flow integrated with Spring Boot. Obviously, for the production-ready application, a lot more details would need to be ironed out to improve user experience and integrity of the payment. But, you have the basics laid out here.
If you want to dive into more details, PayPal API documentation is the perfect place to begin.
In addition to this, you may want to check out another post about how to integrate PayPal Checkout with AWS serverless application, which consists of AWS Lambda function, Dynamo DB and API gateway.
As always, I would love to get some feedback from you. If you have any questions or opinions, feel free to comment using the form bellow.